
![]()
This package comes with the starter web site in .zip format. Unzip the package and start editing the pages. You should keep a backup copy of the .zip in case you need to start over.
We have included a basic site structure with common pages that you may use to start with. You may rename the pages, add more pages, and add your content.
This template uses CSS for the layout. Because the FrontPage "design view" is not as sophisticated at displaying CSS properly, the heading fonts or spacing might seem too large or too small. This can be frustrating if you are used to getting a good "preview" of what your site looks like, but you'll find that it is almost just as easy to keep previewing your site in a browser as you make changes. You will still be able to edit your text and add content as you normally would; after you save, go to File > Preview in Browser to view your site in a browser and make sure that it really looks as it should.
Also, occasionally FrontPage's Normal/Design view may "lose" the formatting. When this happens, just press "F5" to refresh the view and the styles will return.
This template does not require FrontPage extensions.
NOTE: If you want to add FrontPage forms to your site, your web site will need to be published on a server that has FrontPage extensions. Check with your hosting provider to make sure that you can use FrontPage forms on your site.
This template is offered in good faith. The purchaser agrees to
not hold Long2 Consulting or any its subsidiary companies liable for
any loss of revenue, time, or other damages that might be incurred,
directly or indirectly, through the use of a "Long2 Consulting
Companies" template.
You should carefully read the License Agreement that came in the
template package before using this template.
You use of the template indicates your acceptance of the terms of
this License Agreement. Long2 Consulting companies grants you the
following license.
The copyright for this template and accompanying design remains with the designer, Long2 Consulting. You may not claim ownership of the design, nor may you use it for any purpose other than that explicitly set forth in the separate license agreement.
Unlike some other template developers, we don't charge extra for an unbranded template. You CAN remove the link to Long2 Consulting in the copyright. However, we would appreciate you keeping the link and letting us know the site domain where you used the template. Send us an e-mail when you have your site completed!
If you are developing a site for a customer using this template, you may NOT put Website by @ Yourself, Created by Yourself, or Designed by Yourself. You MAY use Website Developed by Yourself. Do not claim any copyright on the design.
You may use the template graphics in a single application, free from
copyright infringement. If the main graphic image is accompanied by a
copyright symbol, such as a royalty-free image, this symbol may not be
removed from the image.
If the user exchanges the main graphical image or changes the template
images or layout, Long2 Consulting does not guarantee the template's
performance. Changing images or modifying the layout is at the sole risk
to the user. Long2 Consulting does not guarantee the performance of any
altered template.
You may not transfer this template to any other user, either group or
individual, without the permission of Long2 Consulting.
The images and/or photos in this template page are copyrighted. These images and/or photos may not be copied or downloaded without permission from the licensor. If you wish to use these images for any purpose other than this template, such as marketing materials, please go to Bigstockphoto.com and look for the following image(s).
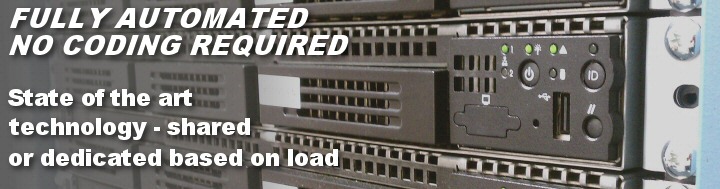
1. bigstockphoto__D_Computer_Servers_926463
2.
If you are purchasing this template and intend on using it to build a site for someone else, you must disclose to your client that this template uses Bigstockphoto.com images.
Monitor ©Linda Long Photography
Keyboard ©Linda Long Photography
Images used in this template are original photographs by Linda Long. The images and/or photos in this template page are copyrighted. These images and/or photos may not be copied or downloaded without permission from the licensor.
NOTE: The images used in this template can only be used in this template and you cannot extract and use these photos for any other use. All copyrights remain with the original licensor.
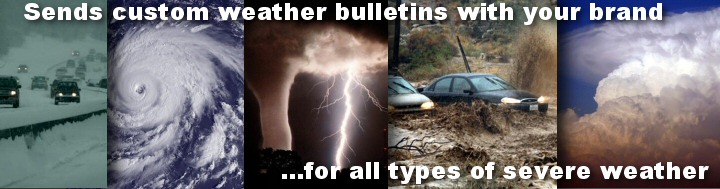
The main images are called using a jQuery rotator script called
Cycle. First, create your new pictures. They must be 720 pixels wide by 189 pixels tall. Name
them pic1.jpg, pic2.jpg, and so forth and put them in the images folder. Say yes to replace the old pictures.
NOTE: You might want to rename the old pictures first and then just insert the new pictures so you have a backup of the old pictures!
Next, add your pictures and change the display speed and effects:
To change the pictures, the display effect, or the speed, open the mainimage.htm page that is in the includes folder. Look for the following code:
<div id="mainpic" class="pics">
<img src="../images/pic1.jpg" />
<img src="../images/pic2.jpg" />
<img src="../images/pic3.jpg" />
</div>
<script type="text/javascript">
$(function() {
$('#mainpic').cycle({
fx: 'fade',
speed: 2500
});
});
</script>
The items in red can be changed. You can add as many pictures as you want to the mainpic div and the script will cycle through them. You can change the fx to any of the following options:
blindXblindYblindZcovercurtainXcurtainYfadefadeZoomgrowXgrowYscrollUpscrollDownscrollLeftscrollRightscrollHorzscrollVertshuffleslideXslideYtossturnUpturnDownturnLeftturnRightuncoverwipezoomNext you may want to choose speed and timeout values to control how
fast and how often the slide transitions occur. The speed
option defines the number of milliseconds it will take to transition
from one slide to the next. The timeout option specifies
how many milliseconds will elapse between the start of each transition.
Currently the code does not include a timeout option. If you want to add
it, your code would look like this:
<script type="text/javascript">
$(function() {
$('#mainpic').cycle({
fx: 'fade',
speed: 2500,
timeout: 2000
});
});
</script>
The image rotator uses jQuery (a JavaScript toolkit). This script is furnished under the GPL license which is included with the template. This script is provided AS IS; although we have provided instructions on adding pictures and changing the settings. If you have problems with this script, please visit the jQuery forums at: http://groups.google.com/group/jquery-en?hl=en or for more information on this script, visit http://malsup.com/jquery/cycle/begin.html
*Note: All source files are licensed for use with this web site template only and may not be used in any other projects, web sites, or applications.
Expression Web or FrontPage 2003: This template was designed specifically for the Expression Web and FrontPage 2003 programs. Because the template uses dynamic web template (.dwt) pages, it is NOT compatible with earlier versions of FrontPage.
Dynamic Web Template pages can be found within the dwt_templates folder of your web. These pages all have a .dwt extension. DWT pages contain the basic structure for all of the web (.htm) pages. You will find a .dwt for each different page layout included in your template package. If you change a DWT page, all of the web pages based on that DWT will also change. DWT pages have two types of regions: editable and non-editable.
This template allows you to delete the pages you do not need or to
rename existing pages. To edit the existing .htm pages, just delete our
sample content. You can then type your own text and add any additional
photos. Note that you will not be able to edit the non-editable regions.
If you delete all content from an editable region, it may disappear and
be difficult to find. Switch to Code or Split view and look for the
following:
<!-- #BeginEditable "content" --><!-- #EndEditable -->
Type some placeholder text between the two tags as follows:
<!-- #BeginEditable "content" --><p>MyContent</p><!-- #EndEditable -->
Switch back to Design view and you will now see the editable region and you can add your content.
Because this template uses several DWT pages for layouts, we use include pages to for items that appear on all pages, but that you will want to edit. This allows you to easily change your links on the appropriate include page, rather than make changes to several DWT pages. Your include page will most likely look like there is no formatting. Just make your changes and save the include page. The correct formatting will appear on the actual HTML page. You will typically find the following include pages in the includes folder:
This template has two sets of navigation links depending on the layout you use. To edit the navigation links, you must update the include files. The links are made up of hard-coded text links.
topnavlinks: The horizontal links below the main graphic area. Limit to about 10 links.
sidelinks: The vertical links on left in the 2 column and 3 column layouts. These have a heading that you can use or remove.
<div class="menuheader1"><a href="#">Main Menu</a></div> ***To
make this into a link change the # to the page link.***
<div class="sidelinks">
<a href="index.htm">Home</a>
<a href="contactus.htm">Contact Us</a>
<a href="store.htm">Our Store</a>
</div>
<div class="menuheader2"><a href="store.htm">Our Store</a></div> ***If
you don't want two levels for menus, just delete the menuheader divs***
<div class="sidelinks">
<a href="product1.htm">Product 1</a>
</div>
<div class="menuheader1"><a href="#">Layouts</a></div>
<div class="sidelinks">
<a href="layout1.htm">Layout 1</a>
<a href="layout2.htm">Layout 2</a>
<a href="layout3.htm">Layout 3</a>
</div>
<div class="menuheader1"><a href="#">Template Info</a></div>
<div class="sidelinks">
<a href="typography.htm">Typography</a>
<a href="gettingstarted.htm">Getting Started</a>
</div>
In the include page you can do the following:
To delete a link, remove the entire line of code for that link.
To add a link, simply copy one of the existing links and then paste it where you want the new link. Enter the correct page name and title for the link. The page name is the part that has the .htm, for example index.htm is the page name for the page with the title Home. Note: don't change the page name of your home page to anything other than index.htm. This is a standard name for homepages.
NOTE: When you change the navigation structure, it might not be visible until you Publish the site to your web server. Try to use File, Preview in Browser to see your changes, if they don't appear, try publishing the site to a test area on your server.
The News areas don't use any special features. Just use regular paragraph with either news1 or news2 classes applied to the paragraphs for the headers to separate your news items. See the layout3 page code for examples!
This template contains search engine meta tags on each page which you should fill out with the site information so the site is indexed by search engines.
Use headings to separate your content into sections. To apply a heading, place your cursor in the text and select the heading from the styles box that is located to the left of the font box.
Regular text
The footer can be edited in the include page. Modify the footer with your own company information and links.
This template uses a layout and styles defined through CSS. You will need to be comfortable with basic CSS if you want to make changes to the styles of this site. To make changes to the layout, you must have at least intermediate CSS skills. Here are some resources to help you with CSS:
We do not have the resources to change template images or colors for free on request. We do offer custom design services at reasonable rates for these types of template modifications, please visit our custom page at www.long2consulting.com. We do not recommend you attempt to make major changes to this template package.
We offer customer support for our products. If you have a question regarding your template, please send us an e-mail message and we'll quickly get you the answers you need.
We do NOT offer support on how to use FrontPage or Expression Web beyond the instructions given within this template. Please use the following sources to help you learn how to perform web building tasks: